Remember that blast of icy cold air on a sweltering summer day? For many of us with classic cars, that feeling is a distant memory. The culprit? Often, it's the old R12 refrigerant system struggling to keep up or, worse, completely defunct.
Dealing with an outdated R12 air conditioning system can feel like navigating a frustrating maze. Finding qualified technicians familiar with the older refrigerant is becoming increasingly difficult, and the cost of R12 itself has skyrocketed due to its phase-out. You're stuck with a car that's beautiful but lacks a crucial comfort feature, and the thought of expensive and complicated repairs looms large.
This guide offers a comprehensive, step-by-step approach to converting your vehicle's R12 AC system to the more readily available and environmentally friendly R134a refrigerant. We'll break down the process, from identifying the necessary components to the actual conversion steps, empowering you to take control of your classic car's comfort and restore that refreshing blast of cold air.
In this guide, we'll cover everything from the essential tools and safety precautions to the detailed steps of retrofitting your AC system. We will delve into topics such as evacuating the old R12 refrigerant, replacing the receiver drier, flushing the system, and properly charging it with R134a. We will also talk about what to consider when doing an AC Retrofit Guide.
Why Convert to R134a?
The core reason to switch over to R134a refrigerant is simply practicality. R12 is a chlorofluorocarbon (CFC) that damages the ozone layer. Its production was phased out years ago, making it incredibly expensive and difficult to source legally. I remember when my uncle had an old pickup truck that still used R12. Finding someone to service it was a nightmare! We drove all over town, calling every mechanic we could find. Most either refused to work on it or quoted exorbitant prices. That's when he started seriously considering the conversion. This scarcity means that even a simple leak can turn into a major headache, costing you a fortune in refrigerant alone.
R134a, on the other hand, is a hydrofluorocarbon (HFC) and doesn't deplete the ozone layer. It's widely available, relatively inexpensive, and most importantly, compatible with many older AC systems after a proper retrofit. While R134a isn't a perfect solution environmentally (it does have a global warming potential), it's a far more practical and sustainable option for maintaining the air conditioning in your classic vehicle. Moreover, many modern refrigerants exist and are being implemented to continue to protect our environment.
Converting to R134a opens the door to easier maintenance and repairs. Most auto mechanics are familiar with R134a systems, and parts are readily available. This means you won't be scrambling to find specialized R12 technicians or paying a premium for obsolete components. In essence, switching to R134a brings your classic car's AC system into the modern era, ensuring reliable cooling for years to come. Remember though, do your research and always consult with a professional if you are unsure of anything. Working with refrigerants requires proper training and equipment. Stay safe and informed!
Tools and Materials You'll Need
Before diving into the conversion process, let's gather the necessary tools and materials. This will ensure a smooth and efficient retrofit. Think of it like preparing your ingredients before starting a recipe – having everything on hand makes the whole process much easier and less stressful. Here's a comprehensive list:
R134a Refrigerant: The star of the show! Choose a reputable brand and ensure it's compatible with your vehicle's system size. R134a Conversion Fittings: These adapters connect to your existing service ports, allowing you to connect R134a-compatible gauges and equipment. Vacuum Pump: Essential for evacuating the old refrigerant and moisture from the system. Manifold Gauge Set: Used to monitor pressure readings during evacuation and charging. Refrigerant Oil: Specifically designed for R134a systems. The type of oil (PAG or Ester) depends on your compressor – consult your vehicle's manual or a professional. New Receiver Drier: A crucial component that removes moisture and contaminants from the refrigerant. Always replace this during a conversion. O-Rings: R134a requires different O-rings than R12. Purchase a kit specifically designed for R134a conversions. Flush Kit: Used to clean out the old oil and contaminants from the system components. Safety Glasses and Gloves: Protecting your eyes and skin is paramount when working with refrigerants. Leak Detector: Helps identify any leaks after the conversion. Basic Hand Tools: Wrenches, screwdrivers, pliers, etc. Service Manual: Your vehicle's service manual is invaluable for identifying components and specific procedures.
Having these tools and materials organized and readily accessible will make the conversion process much smoother. Remember, safety first! Always wear safety glasses and gloves when working with refrigerants and follow all safety precautions outlined in the instructions and manuals.
A Brief History of Refrigerants
The history of refrigerants is a fascinating journey of innovation, environmental awareness, and technological advancement. In the early days of air conditioning, highly toxic and flammable substances like ammonia, methyl chloride, and sulfur dioxide were used. Imagine the potential hazards! These refrigerants posed significant risks to both technicians and vehicle occupants.
In the 1930s, the introduction of chlorofluorocarbons (CFCs), specifically R12, revolutionized the industry. R12 was hailed as a miracle refrigerant – non-toxic, non-flammable, and highly efficient. It quickly became the standard in automotive and residential air conditioning systems. For decades, R12 reigned supreme, providing reliable cooling without the immediate dangers of its predecessors. However, the celebration was short-lived.
In the 1970s, scientists discovered that CFCs were depleting the ozone layer, a critical shield that protects the Earth from harmful ultraviolet radiation. This discovery led to the Montreal Protocol in 1987, an international treaty that phased out the production and use of CFCs, including R12. R134a emerged as a primary replacement for R12 in automotive applications. While R134a doesn't deplete the ozone layer, it has a global warming potential, leading to the development of newer refrigerants like HFO-1234yf. The evolution of refrigerants continues, driven by the need for environmentally friendly and efficient cooling solutions. This history highlights the importance of continuous innovation and responsible stewardship of our planet.
Hidden Secrets of a Successful Retrofit
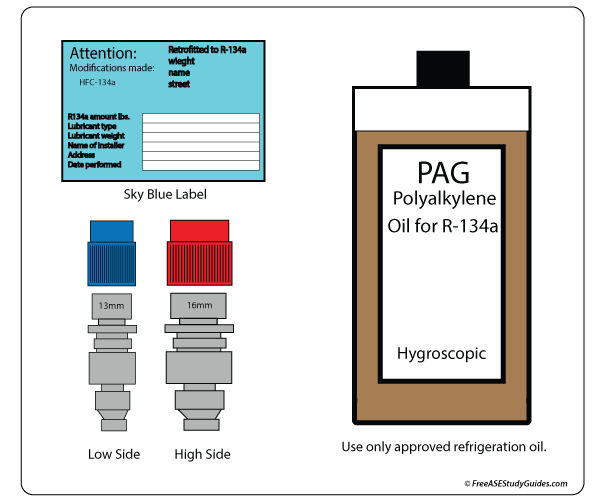
Beyond the basic steps, several often-overlooked details can significantly impact the success and longevity of your R12 to R134a conversion. These "hidden secrets" can make the difference between a system that cools effectively for years and one that quickly fails or provides inadequate cooling. First, ensure you use the correct type and amount of refrigerant oil. R134a is not compatible with the mineral oil used in R12 systems. You'll need to use either PAG (polyalkylene glycol) or Ester oil, depending on your compressor type. Using the wrong oil can lead to compressor failure and costly repairs.
Next, don't skimp on the flushing process. Thoroughly flushing the system to remove all traces of the old mineral oil and contaminants is crucial. Residual mineral oil can react with the R134a and form sludge, clogging the system and reducing its efficiency. Use a dedicated AC flush solvent and follow the instructions carefully. Also, pay close attention to O-rings and seals. R134a molecules are smaller than R12 molecules, meaning they can leak through old, worn O-rings and seals. Replace all O-rings with R134a-compatible versions. Consider replacing the Schrader valves in the service ports as well, as these can also be a source of leaks.
Finally, properly labeling your system is essential. Once the conversion is complete, clearly label the service ports and any other relevant components to indicate that the system now uses R134a. This will prevent accidental contamination with R12 in the future. By paying attention to these hidden secrets, you can significantly improve the performance and lifespan of your R134a-converted AC system. Remember, a little extra effort upfront can save you a lot of headaches down the road.
Professional Recommendations for R134a Conversion
While this guide provides a comprehensive overview of the R12 to R134a conversion process, it's crucial to understand your limitations and seek professional assistance when necessary. Air conditioning systems are complex, and improper handling of refrigerants can be dangerous and environmentally harmful. A certified AC technician has the knowledge, experience, and specialized equipment to perform the conversion safely and effectively.
Before attempting the conversion yourself, consider consulting with a professional to assess the condition of your existing AC system. They can identify any potential problems, such as leaks, compressor issues, or damaged components, and recommend the appropriate course of action. They can also advise you on the correct type and amount of refrigerant oil to use, ensuring optimal system performance. If you're not comfortable working with refrigerants or lack the necessary tools, it's always best to leave the conversion to the professionals. They can properly evacuate the old R12 refrigerant, dispose of it responsibly, and recharge the system with R134a to the correct pressure.
Even if you decide to tackle the conversion yourself, consider having a professional inspect the system afterward to ensure it's working correctly and there are no leaks. A professional leak test can identify even the smallest leaks that you might miss, preventing future problems. Remember, your safety and the environment are paramount. Don't hesitate to seek professional assistance when needed. A properly converted AC system will provide years of reliable cooling and enhance the value of your classic vehicle.
Step-by-Step Conversion Process
Okay, let's get into the nitty-gritty of the R12 to R134a conversion. Remember, safety first! Wear your safety glasses and gloves throughout the process.Step 1: Recover the R12 Refrigerant. This is arguably the most crucial step and, ideally, should be done by a certified technician. It's illegal to vent R12 into the atmosphere due to its ozone-depleting properties. A professional will use specialized equipment to safely recover the refrigerant.Step 2: Flush the System. Disconnect the hoses from the compressor, evaporator, and condenser. Use an AC flush solvent to thoroughly clean each component, removing any residual mineral oil and contaminants. Be sure to follow the solvent manufacturer's instructions carefully.Step 3: Replace the Receiver Drier. The receiver drier acts like a filter, removing moisture and contaminants from the refrigerant. Always replace this when converting to R134a.Step 4: Replace O-Rings. R134a requires different O-rings than R12. Replace all O-rings in the system with R134a-compatible versions.Step 5: Install Conversion Fittings. Attach the R134a conversion fittings to the service ports. These fittings will allow you to connect your R134a-compatible gauges and equipment.Step 6: Add Refrigerant Oil. Add the correct type and amount of refrigerant oil to the system. Consult your vehicle's manual or a professional for the specific oil requirements.Step 7: Evacuate the System. Connect a vacuum pump to the service ports and evacuate the system for at least 30-45 minutes. This removes any air and moisture from the system.Step 8: Charge the System with R134a. Use a manifold gauge set to carefully charge the system with R134a. Consult your vehicle's manual or a professional for the correct charging pressure.Step 9: Leak Test. Use a leak detector to check for any leaks in the system. Address any leaks immediately.Step 10: Test the System. Start the engine and turn on the AC to test the system. Verify that the compressor is cycling properly and that the air is blowing cold. If the system is not working correctly, consult a professional for diagnosis and repair.
Essential Tips for a Successful R134a Conversion
To maximize the chances of a successful and long-lasting R134a conversion, keep these essential tips in mind: Thorough Cleaning is Key: Don't underestimate the importance of flushing the system thoroughly. Residual mineral oil can cause significant problems. Use Quality Components: Invest in high-quality conversion fittings, O-rings, and a receiver drier. Cheap components can fail prematurely, leading to leaks and system failure.Proper Oil Selection: Using the correct type and amount of refrigerant oil is crucial for compressor longevity. Consult your vehicle's manual or a professional for guidance. Vacuum, Vacuum, Vacuum: Evacuating the system for an adequate amount of time is essential for removing all air and moisture.Charge Carefully: Overcharging or undercharging the system can negatively impact performance. Use a manifold gauge set and follow the recommended charging pressure. Monitor System Performance: After the conversion, monitor the system's performance closely. Check the vent temperature and listen for any unusual noises.Address Issues Promptly: If you notice any problems, such as leaks or poor cooling performance, address them promptly. Ignoring issues can lead to more significant damage. Document Everything: Keep a record of all the components you replaced, the type and amount of refrigerant oil you used, and the charging pressure. This will be helpful for future maintenance and repairs.Seek Professional Help When Needed: Don't hesitate to consult a professional if you're unsure about any aspect of the conversion process. Be Patient: Converting to R134a is not a quick fix. Take your time and follow the instructions carefully. A well-executed conversion will provide years of reliable cooling.
Understanding Refrigerant Oil Compatibility
Choosing the right refrigerant oil is crucial for the health and longevity of your AC system. R134a is not compatible with the mineral oil used in R12 systems. Using the wrong oil can lead to compressor failure and costly repairs. The two main types of refrigerant oil used in R134a systems are PAG (polyalkylene glycol) and Ester oil. PAG oil is the most common type and is typically used in systems with variable displacement compressors. Ester oil is often used in systems with fixed displacement compressors. Consult your vehicle's manual or a professional for the specific oil requirements for your compressor. When adding refrigerant oil, be sure to use the correct amount. Overfilling or underfilling can negatively impact system performance. The recommended oil capacity is typically listed in your vehicle's manual. If you're unsure, consult a professional. It's also important to note that different types of PAG oil have different viscosities. Using the wrong viscosity can also damage the compressor. Consult your vehicle's manual or a professional to determine the correct viscosity for your system. If you're switching from mineral oil to PAG or Ester oil, be sure to flush the system thoroughly to remove all traces of the old oil. Residual mineral oil can react with the R134a and form sludge, clogging the system and reducing its efficiency. By understanding refrigerant oil compatibility and selecting the correct type and amount of oil, you can ensure the optimal performance and longevity of your AC system.
Fun Facts About AC and Refrigerants
Did you know that the first modern air conditioning system was invented in 1902 by Willis Carrier? He developed it to control humidity in a printing plant, not to cool people. The first air-conditioned car was introduced in 1939 by Packard. However, it was expensive and took up a significant portion of the trunk space. The term "Freon" is actually a trademarked name for a family of refrigerants developed by Du Pont. R12 was one of the most popular Freon refrigerants. Early refrigerants, like ammonia and sulfur dioxide, were highly toxic and flammable, posing significant risks. The discovery of the ozone-depleting effects of CFCs, like R12, led to the Montreal Protocol, an international treaty that phased out their production and use. R134a, the primary replacement for R12, is not ozone-depleting but has a global warming potential. Newer refrigerants, like HFO-1234yf, have a significantly lower global warming potential than R134a. The efficiency of an air conditioning system is measured by its Seasonal Energy Efficiency Ratio (SEER). A higher SEER rating indicates a more efficient system. Air conditioning systems not only cool the air but also dehumidify it, making it more comfortable. Some modern cars use sensors to detect the presence of refrigerants in the cabin and automatically activate the recirculation mode to prevent them from entering. The development of air conditioning has had a profound impact on society, enabling people to live and work comfortably in hot and humid climates.
How To Find a Qualified AC Technician
Finding a qualified AC technician is crucial for a successful and safe R12 to R134a conversion. Start by asking for recommendations from friends, family, and other car enthusiasts. Personal referrals are often the best way to find a reliable and trustworthy technician. Check online reviews and ratings for local AC repair shops. Websites like Yelp, Google Reviews, and the Better Business Bureau can provide valuable insights into the quality of service and customer satisfaction. Look for technicians who are certified by organizations like the Mobile Air Conditioning Society (MACS). MACS certification demonstrates that the technician has the knowledge and skills to work on automotive AC systems. Inquire about the technician's experience with R12 to R134a conversions. A technician with experience in this specific type of conversion is more likely to perform the job correctly. Ask for a written estimate before authorizing any work. The estimate should include a detailed breakdown of the costs for parts, labor, and refrigerant. Make sure the technician is licensed and insured. This will protect you in case of any accidents or damages. Ask about the technician's warranty policy. A reputable technician will stand behind their work and offer a warranty on parts and labor. Trust your gut. If you don't feel comfortable with a technician, don't hesitate to find someone else. A good technician will be honest, transparent, and willing to answer all your questions. By following these tips, you can increase your chances of finding a qualified AC technician who can perform the R12 to R134a conversion safely and effectively.
What If the Conversion Fails?
Even with careful planning and execution, an R12 to R134a conversion can sometimes fail. If you encounter problems after the conversion, don't panic. Here are some common issues and troubleshooting steps: Leaking Refrigerant: This is one of the most common problems after a conversion. Check all connections, fittings, and O-rings for leaks. Use a leak detector to pinpoint the source of the leak. Replace any damaged or worn components. Poor Cooling Performance: If the AC system is not cooling as well as it should, check the refrigerant level. Overcharging or undercharging can negatively impact performance. Also, check the compressor, condenser, and evaporator for any obstructions or damage.Compressor Failure: Compressor failure can occur due to improper oil selection, contamination, or excessive wear. If the compressor is not working, it will need to be replaced. Clogged System: A clogged system can be caused by residual mineral oil, debris, or refrigerant sludge. Flush the system thoroughly to remove any obstructions.High Head Pressure: High head pressure can indicate a clogged condenser, overcharging, or a faulty expansion valve. Check these components and address any issues. Strange Noises: Unusual noises from the AC system can indicate a problem with the compressor, bearings, or other components. Consult a professional for diagnosis and repair. If you're unable to diagnose and repair the problem yourself, it's best to seek professional assistance. A qualified AC technician can identify the root cause of the issue and recommend the appropriate course of action. Remember, safety first! If you're working with refrigerants, always wear safety glasses and gloves and follow all safety precautions. By troubleshooting potential problems and seeking professional help when needed, you can overcome challenges and ensure a successful R12 to R134a conversion.
Top 5 Mistakes to Avoid During an R134a Conversion
To ensure a successful R12 to R134a conversion, avoid these common mistakes: Skipping the Flushing Process: Flushing the system is essential for removing residual mineral oil and contaminants. Skipping this step can lead to compressor failure and poor cooling performance. Using the Wrong Refrigerant Oil: R134a is not compatible with the mineral oil used in R12 systems. Using the wrong oil can damage the compressor.Neglecting O-Ring Replacement: R134a requires different O-rings than R12. Neglecting to replace the O-rings can lead to leaks. Overcharging or Undercharging the System: Overcharging or undercharging can negatively impact performance. Use a manifold gauge set and follow the recommended charging pressure.Ignoring Leak Detection: After the conversion, it's essential to check for leaks. Ignoring leaks can lead to refrigerant loss and environmental damage. Bonus Mistake: Not Seeking Professional Help When Needed: Don't hesitate to consult a professional if you're unsure about any aspect of the conversion process. A qualified technician can ensure a safe and successful conversion. By avoiding these mistakes, you can increase your chances of a successful R134a conversion and enjoy reliable cooling in your classic vehicle.
Question and Answer
Q: Is it legal to convert my R12 system to R134a?
A: Yes, it's generally legal to convert your R12 system to R134a, as long as you follow proper procedures and don't vent R12 into the atmosphere. Recovering R12 requires EPA-certified equipment.Q:How much does it cost to convert from R12 to R134a?
A: The cost can vary widely depending on the parts you replace and whether you do it yourself or hire a professional. Expect to pay anywhere from $200 to $800 or more.Q:Will R134a cool as well as R12?
A: R134a is generally less efficient than R12. You may notice a slight decrease in cooling performance, especially in very hot weather. However, a properly converted system should still provide adequate cooling.Q:Can I just add R134a to my R12 system without converting it?
A: No, you should never mix R12 and R134a. The two refrigerants are not compatible and can damage your AC system.
Conclusion of How to Convert R12 to R134a: Step-by-Step AC Retrofit Guide
Converting your classic car's AC system from R12 to R134a is a worthwhile project that can restore comfort and ensure easier maintenance in the long run. While the process requires careful attention to detail and adherence to safety precautions, it's a manageable task for the experienced DIYer. By following the steps outlined in this guide, you can successfully convert your system, enjoy refreshing cold air, and avoid the hassles and expense of dealing with obsolete R12 refrigerant. Remember to prioritize safety, use quality components, and seek professional assistance when needed. With a little effort, you can breathe new life into your classic car's AC system and cruise in comfort for years to come.